Database Management
For our players to find each other in the online game, we need four things:
To let players set a username.
To let them choose a cluster. That is a region for the server hosting their lobby.
To let them create or list lobbies.
Matchmaking rules that determine which players can list which lobbies.
In this part, we'll tackle the first point and write code to store and retrieve player data in the database. We'll learn how to use GDScript to write to the database and query data without having to leave the comfort of Godot, using the W4 Mapper.
Databases in W4 Cloud
W4 Cloud uses Supabase behind the scenes, which itself is a thin wrapper over PostgreSQL.
This means you can store and retrieve whatever data you'd like from W4, as it provides you with a fully-fledged database.
If you prefer to avoid writing SQL, though, we've got you covered! Our technology lets you interact with the database with regular GDScript code.
See also
You can learn more about our database features in the Database (Supabase) section of the documentation.
Storing player usernames
When players first log into the game, they don't have a username. Instead, they have a user id, which is either their account's email, or, in our case, a random string we use to authenticate them.
To allow users to choose and save their username, we need to store this data in
the database. So, we will create a profile table in our W4 Cloud SQL
database.
This table will have two fields:
An
idfield that we use to link each user profile to a user. It's a foreign key to theuidfield of theuserstable, which means it's a link to each users'uiddata. This makes it so each row in the profile is linked to the corresponding user.A
usernamefield, which is a freestanding text string.
Let's create this table using only GDScript code!
Using the W4 Mapper to query and write to the database
Open the script file we prepared for you: data/database_manager.gd. It's
nearly empty.
In it, we will write:
A function that the W4 plugin can run to add the
profiletable to our databaseA
Profileobject with the properties we want to store in the database: the player's username and their unique ID used for link them to an authentication id.
Let's start with the Profile! We can define a class in GDScript to
represent our table. The class's properties represent our table's
desired fields.
In the class, we can define functions that will be called by the W4RMMapper object. It's the utility we provide in the addon to update the database from the comfort of GDScript.
Inside database_manager.gd, complete the Profile class with the following code:
## Represents a player's profile as stored in the database.
class Profile:

    ## A static and unique id for the player. The StringName type gets converted to an index in the SQL database.
    ## This is a foreign key towards `users.uid`
    var id: StringName
    ## The username entered by the player.
    var username: String

    # Called by the W4 mapper to set specific column options in the SQL database.
    static func _w4rm_type_options(opts: Dictionary) -> void:
        opts["id"] = W4RM.tref("auth.users", {
            default = "auth.uid()",
            external = true,
        })

    # Called by the W4 mapper to set specific column policies in the SQL database.
    static func _w4rm_security_policies(policies: Dictionary) -> void:
        policies["Anyone can view profiles"] = W4RM.build_security_policy_for(['anon', 'authenticated']).can_select()
        policies["User can create own profile"] = W4RM.build_security_policy_for('authenticated').owner_can_insert('id')
        policies["User can update own profile"] = W4RM.build_security_policy_for('authenticated').owner_can_update('id')
As the Profile class has two properties, this will create a profile
table with two fields: id and username. When we retrieve a profile
row in Godot, that row will be automatically mapped to an instance of the
Profile class.
id will be static and unique because StringName gets converted
to an index in the database.
The two static functions help set up the table.
_w4rm_type_options()sets database foreign keys. The option we set in the function ensures that theProfile'sidcolumn defaults to the current player'sid._w4rm_security_policies()creates security policies. This ensures that only selected users can change or access the data. In this case, the policy ensures that:Anyone can see the user's profile.
A user can create and update their own profile.
To learn more about security policies, check out Supabase's documentation and our Godot implementation of security policies.
We still need to set up the database mapper. In the same file,
database_manager.gd, define the following two static functions:
## Appends custom types and tables to the mapper so it can be used throughout
## the application. Run this once before using any database call.
static func setup_mapper(mapper) -> void:
    mapper.add_table("Profile", Profile)
    mapper.done()

## Creates the table on W4 cloud's database.
##
## Run this function once through the W4 dock in the Godot editor to create a
## table on the remote W4 database. It ensures all tables in the mapper get
## created.
## If the table already exists, it will be dropped first and recreated from
## scratch.
static func run_static(sdk) -> void:
    setup_mapper(sdk.mapper)
    var okay = await sdk.mapper.init_db()
    print("Created DB: %s" % okay)
These two functions serve two different purposes:
run_static()will need to be run once, from the Godot editor, to update the database. We'll do that in the next section.setup_mapper()will need to run every time your game boots to ensure the rows are retrieved when you query the database (otherwise, you'll receive an untyped dictionary).
This is all we need to create a new table, set up rows, and retrieve those rows with typed data in Godot!
Note
Of course, you don't need to define Profile as an internal
class. It could be its own file. Declaring it here helps to
streamline this tutorial.
We're almost done, but before closing the file, we will add two more helper functions:
## Returns a username for a given user id.
##
## Returns name_if_unknown if the player was not found.
static func get_username(id: String, name_if_unknown := "UnknownPlayer") -> String:
    var profile: Profile = await W4GD.mapper.get_by_id(Profile, id)
    if profile == null:
        return name_if_unknown
    return profile.username


## Updates or creates a new profile in the database.
##
## If there was no profile associated with the currently logged-in user, this
## will create a new one.
## If a profile existed, this will update the username.
## If the username is unchanged from its previous state, nothing will happen.
static func set_own_username(new_username: String) -> void:
    var profile: Profile = await W4GD.mapper.get_by_id(Profile, W4GD.get_identity().get_uid())
    if profile == null:
        profile = Profile.new()
        profile.username = new_username
        await W4GD.mapper.create(profile)
    elif profile.username != new_username:
        profile.username = new_username
        await W4GD.mapper.update(profile)
Those two functions will serve as simple utilities to retrieve, update, or insert a user into the database. They also demonstrate how to query the database using the W4 Mapper.
Updating the Remote Database
Open your W4 dashboard, navigate to the API page, and locate the service key:

Copy it.
In Godot, in the W4 dock, locate the Run field at the bottom, and click the browse icon on the right. The icon looks like a script:

Locate the script we just created, database_manager.gd, and click
Run. Enter the service key in the pop-up:
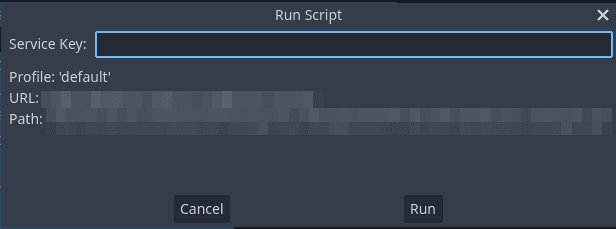
And then press Run. If no errors show up, you can close the log screen. The database is now updated and has user profile data!
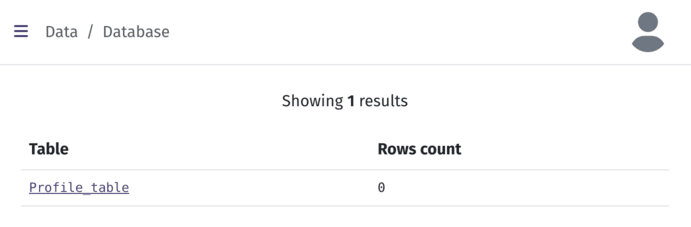
If you go to your W4 dashboard and click on Database on the left, you should see a new table with no rows.
Note that using the service key this way does not expose it to players. The service key will only remain loaded in memory until restarting Godot.
Note
If you want to change your database, you can edit the
database_manager.gd file and run the script again. The script will drop
previously created databases, and recreate them from scratch. So, it's very
easy to iterate quickly.
But be careful, it also means that any data you created will be removed!
We're done with the database part! We can now move on to implementing our matchmaking.